
 yjh0410
5183498321
release YOLOv8-s
yjh0410
5183498321
release YOLOv8-s
|
1 жил өмнө | |
|---|---|---|
| config | 1 жил өмнө | |
| dataset | 1 жил өмнө | |
| deployment | 2 жил өмнө | |
| evaluator | 1 жил өмнө | |
| img_files | 2 жил өмнө | |
| models | 1 жил өмнө | |
| tools | 1 жил өмнө | |
| utils | 1 жил өмнө | |
| .gitignore | 2 жил өмнө | |
| LICENSE | 2 жил өмнө | |
| README.md | 1 жил өмнө | |
| README_CN.md | 1 жил өмнө | |
| demo.py | 1 жил өмнө | |
| engine.py | 1 жил өмнө | |
| eval.py | 1 жил өмнө | |
| requirements.txt | 2 жил өмнө | |
| test.py | 1 жил өмнө | |
| track.py | 2 жил өмнө | |
| train.py | 1 жил өмнө | |
| train.sh | 1 жил өмнө |
README.md
Real-time General Object Detection
English | 简体中文
We are trying to build our real-time general target detection code base based on the core concepts of YOLO. We have reproduced most of the YOLO series. In addition, we have also written an introductory tutorial on YOLO. We hope that by learning YOLO, a very popular general target detection framework, beginners can master the basic knowledge necessary to study general target detection.
If you are interested in our book, you can purchase it on e-commerce platforms such as Taobao and JD.com in China.
Requirements
We recommend you to use Anaconda to create a conda environment:
conda create -n rtcdet python=3.6Then, activate the environment:
conda activate rtcdetRequirements:
Install necessary libraies
pip install -r requirements.txt
(optional) Compile MSDeformableAttention ops for DETR series
cd ./ppdet/modeling/transformers/ext_op/

python setup_ms_deformable_attn_op.py install
See details
My environment:
- PyTorch = 1.9.1
- Torchvision = 0.10.1
At least, please make sure your torch is version 1.x.
Experiments
VOC
Download VOC.
cd <RT-ODLab>
cd dataset/scripts/
sh VOC2007.sh
sh VOC2012.sh
Check VOC
cd <RT-ODLab>
python dataset/voc.py
Train on VOC
For example:
python train.py --cuda -d voc --root path/to/VOCdevkit -m yolov1 -bs 16 --max_epoch 150 --wp_epoch 1 --eval_epoch 10 --fp16 --ema --multi_scale
COCO
Download COCO.
cd <RT-ODLab>
cd dataset/scripts/
sh COCO2017.sh
Clean COCO
cd <RT-ODLab>
cd tools/
python clean_coco.py --root path/to/coco --image_set val
python clean_coco.py --root path/to/coco --image_set train
Check COCO
cd <RT-ODLab>
python dataset/coco.py
Train on COCO
For example:
python train.py --cuda -d coco --root path/to/COCO -m yolov1 -bs 16 --max_epoch 150 --wp_epoch 1 --eval_epoch 10 --fp16 --ema --multi_scale
We also kindly provide a script train.sh to run the training code. You need to follow the following format to use this script:
bash train.sh <model> <data> <data_path> <batch_size> <num_gpus> <master_port> <resume_weight>
For example, we use this script to train YOLOv3 from the epoch-0:
bash train.sh yolov3 coco path/to/coco 128 4 1699 None
We can also continue training from existing weights by passing the model's weight file to the resume parameter.
bash train.sh yolov3 coco path/to/coco 128 4 1699 path/to/yolov3.pth
Test
python test.py -d coco \
               --cuda \
               -m yolov1 \
               --img_size 640 \
               --weight path/to/weight \
               --root path/to/dataset/ \
               --no_multi_labels \
               --visual_threshold 0.35 \
               --show
Evaluation
python eval.py -d coco \
               --cuda \
               -m yolov1 \
               --img_size 640 \
               --weight path/to/weight \
               --root path/to/dataset/ \
               --show
Demo
I have provide some images in data/demo/images/, so you can run following command to run a demo:
python demo.py --mode image \
               --path_to_img data/demo/images/ \
               --cuda \
               --img_size 640 \
               -m yolov2 \
               --weight path/to/weight \
               --show
If you want run a demo of streaming video detection, you need to set --mode to video, and give the path to video --path_to_vid。
python demo.py --mode video \
               --path_to_vid data/demo/videos/your_video \
               --cuda \
               --img_size 640 \
               -m yolov2 \
               --weight path/to/weight \
               --show \
               --gif
If you want run video detection with your camera, you need to set --mode to camera。
python demo.py --mode camera \
               --cuda \
               --img_size 640 \
               -m yolov2 \
               --weight path/to/weight \
               --show \
               --gif
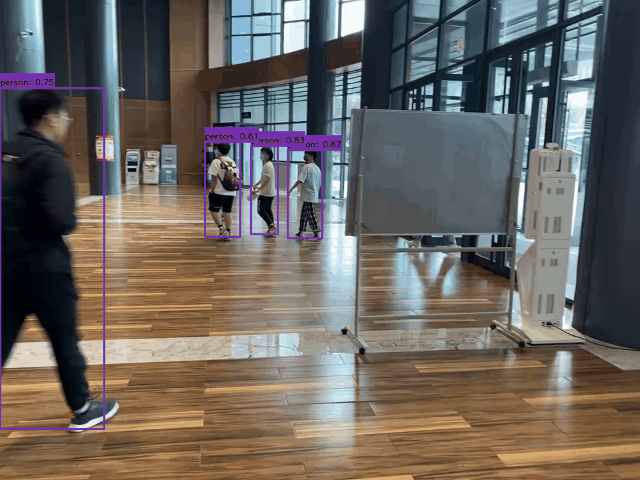
Detection visualization
- Detector: YOLOv2
Command:
python demo.py --mode video \
                --path_to_vid ./dataset/demo/videos/000006.mp4 \
               --cuda \
               --img_size 640 \
               -m yolov2 \
               --weight path/to/weight \
               --show \
               --gif
Results:
Tracking
Our project also supports multi-object tracking tasks. We use the YOLO of this project as the detector, following the "tracking-by-detection" framework, and use the simple and efficient ByteTrack as the tracker.
images tracking
python track.py --mode image \
            --path_to_img path/to/images/ \
            --cuda \
            -size 640 \
            -dt yolov2 \
            -tk byte_tracker \
            --weight path/to/coco_pretrained/ \
            --show \
            --gif
video tracking
python track.py --mode video \
            --path_to_img path/to/video/ \
            --cuda \
            -size 640 \
            -dt yolov2 \
            -tk byte_tracker \
            --weight path/to/coco_pretrained/ \
            --show \
            --gif
camera tracking
python track.py --mode camera \
            --cuda \
            -size 640 \
            -dt yolov2 \
            -tk byte_tracker \
            --weight path/to/coco_pretrained/ \
            --show \
            --gif
Tracking visualization
- Detector: YOLOv2
- Tracker: ByteTracker
- Device: i5-12500H CPU
Command:
python track.py --mode video \
                --path_to_img ./dataset/demo/videos/000006.mp4 \
                -size 640 \
                -dt yolov2 \
                -tk byte_tracker \
                --weight path/to/coco_pretrained/ \
                --show \
                --gif
Results:
![]()
Train on custom dataset
Besides the popular datasets, we can also train the model on ourself dataset. To achieve this goal, you should follow these steps:
Step-1: Prepare the images (JPG/JPEG/PNG ...) and use
labelimgto make XML format annotation files.CustomedDataset |_ train | |_ images | |_ 0.jpg | |_ 1.jpg | |_ ... | |_ annotations | |_ 0.xml | |_ 1.xml | |_ ... |_ val | |_ images | |_ 0.jpg | |_ 1.jpg | |_ ... | |_ annotations | |_ 0.xml | |_ 1.xml | |_ ... | ...Step-2: Make the configuration for our dataset.
cd <RT-ODLab>
cd config/data_config
You need to edit the
dataset_cfgdefined indataset_config.py. You can refer to thecustomeddefined indataset_cfgto modify the relevant parameters, such asnum_classes,classes_names, to adapt to our dataset.
For example:
dataset_cfg = {
    'customed':{
        'data_name': 'AnimalDataset',
        'num_classes': 9,
        'class_indexs': (0, 1, 2, 3, 4, 5, 6, 7, 8),
        'class_names': ('bird', 'butterfly', 'cat', 'cow', 'dog', 'lion', 'person', 'pig', 'tiger', ),
    },
}
Step-3: Convert customed to COCO format.
cd <RT-ODLab>
cd tools
# convert train split
python convert_ours_to_coco.py --root path/to/dataset/ --split train
# convert val split
python convert_ours_to_coco.py --root path/to/dataset/ --split val
Then, we can get a train.json file and a val.json file, as shown below.
CustomedDataset
|_ train
|  |_ images
|     |_ 0.jpg
|     |_ 1.jpg
|     |_ ...
|  |_ annotations
|     |_ 0.xml
|     |_ 1.xml
|     |_ ...
|     |_ train.json
|_ val
|  |_ images
|     |_ 0.jpg
|     |_ 1.jpg
|     |_ ...
|  |_ annotations
|     |_ 0.xml
|     |_ 1.xml
|     |_ ...
|     |_ val.json
|  ...
Step-4 Check the data.
cd <RT-ODLab>
cd dataset
# convert train split
python customed.py --root path/to/dataset/ --split train
# convert val split
python customed.py --root path/to/dataset/ --split val
Step-5 Train
For example:
cd <RT-ODLab>
python train.py --root path/to/dataset/ -d customed -m yolov1 -bs 16 --max_epoch 100 --wp_epoch 1 --eval_epoch 5 -p path/to/yolov1_coco.pth
- Step-6 Test
For example:
cd <RT-ODLab>
python test.py --root path/to/dataset/ -d customed -m yolov1 --weight path/to/checkpoint --show
- Step-7 Eval
For example:
cd <RT-ODLab>
python eval.py --root path/to/dataset/ -d customed -m yolov1 --weight path/to/checkpoint