Here is the source code for an introduction to YOLO. We adopted the core concepts of YOLOv1~v4, YOLOX and YOLOv7 for this project and made the necessary adjustments. By learning how to construct the well-known YOLO detector, we hope that newcomers can enter the field of object detection without any difficulty.
At least, please make sure your torch is version 1.x.
| Model |
Backbone |
Scale |
IP |
Epoch |
APval
0.5
| FPS3090
FP32-bs1
| Weight |
| YOLOv1 |
ResNet-18 |
640 |
√ |
150 |
76.7 |
|
ckpt |
| YOLOv2 |
DarkNet-19 |
640 |
√ |
150 |
79.8 |
|
ckpt |
| YOLOv3 |
DarkNet-53 |
640 |
√ |
150 |
82.0 |
|
ckpt |
| YOLOv4 |
CSPDarkNet-53 |
640 |
√ |
150 |
83.6 |
|
ckpt |
| YOLOX-L |
CSPDarkNet-L |
640 |
√ |
150 |
84.6 |
|
ckpt |
| YOLOv7-Large |
ELANNet-Large |
640 |
√ |
150 |
86.0 |
|
ckpt |
All models are trained with ImageNet pretrained weight (IP). All FLOPs are measured with a 640x640 image size on VOC2007 test. The FPS is measured with batch size 1 on 3090 GPU from the model inference to the NMS operation.
COCO
For example:
python train.py --cuda -d coco --root path/to/COCO -m yolov1 -bs 16 --max_epoch 150 --wp_epoch 1 --eval_epoch 10 --fp16 --ema --multi_scale
Train
Single GPU
sh train_single_gpu.sh
You can change the configurations of train_single_gpu.sh, according to your own situation.
You also can add --vis_tgt to check the images and targets during the training stage. For example:
python train.py --cuda -d coco --root path/to/coco -m yolov1 --vis_tgt
Multi GPUs
sh train_multi_gpus.sh
You can change the configurations of train_multi_gpus.sh, according to your own situation.
In the event of a training interruption, you can pass --resume the latest training
weight path (None by default) to resume training. For example:
python train.py \
        --cuda \
        -d coco \
        -m yolov1 \
        -bs 16 \
        --max_epoch 300 \
        --wp_epoch 3 \
        --eval_epoch 10 \
        --ema \
        --fp16 \
        --resume weights/coco/yolov1/yolov1_epoch_151_39.24.pth
Then, training will continue from 151 epoch.
Test
python test.py -d coco \
               --cuda \
               -m yolov1 \
               --img_size 640 \
               --weight path/to/weight \
               --root path/to/dataset/ \
               --show
For YOLOv7, since it uses the RepConv in PaFPN, you can add --fuse_repconv to fuse the RepConv block.
python test.py -d coco \
               --cuda \
               -m yolov7_large \
               --fuse_repconv \
               --img_size 640 \
               --weight path/to/weight \
               --root path/to/dataset/ \
               --show
Evaluation
python eval.py -d coco-val \
               --cuda \
               -m yolov1 \
               --img_size 640 \
               --weight path/to/weight \
               --root path/to/dataset/ \
               --show
Demo
I have provide some images in data/demo/images/, so you can run following command to run a demo:
python demo.py --mode image \
               --path_to_img data/demo/images/ \
               --cuda \
               --img_size 640 \
               -m yolov2 \
               --weight path/to/weight \
               --show
If you want run a demo of streaming video detection, you need to set --mode to video, and give the path to video --path_to_vid。
python demo.py --mode video \
               --path_to_vid data/demo/videos/your_video \
               --cuda \
               --img_size 640 \
               -m yolov2 \
               --weight path/to/weight \
               --show \
               --gif
If you want run video detection with your camera, you need to set --mode to camera。
python demo.py --mode camera \
               --cuda \
               --img_size 640 \
               -m yolov2 \
               --weight path/to/weight \
               --show \
               --gif
Detection visualization
Command:
python demo.py --mode video \
                --path_to_vid ./dataset/demo/videos/000006.mp4 \
               --cuda \
               --img_size 640 \
               -m yolov2 \
               --weight path/to/weight \
               --show \
               --gif
Results:
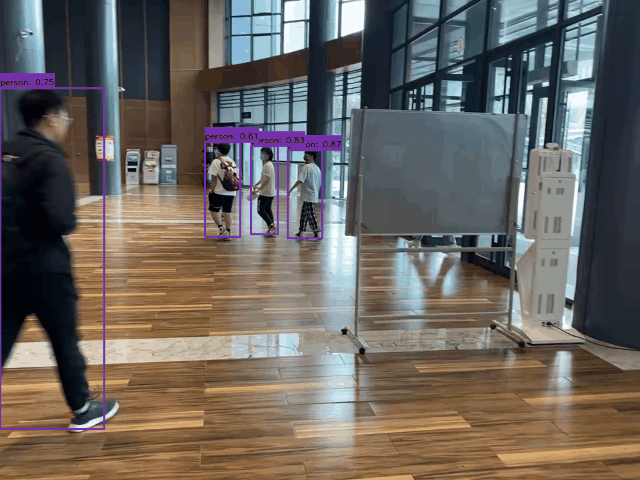
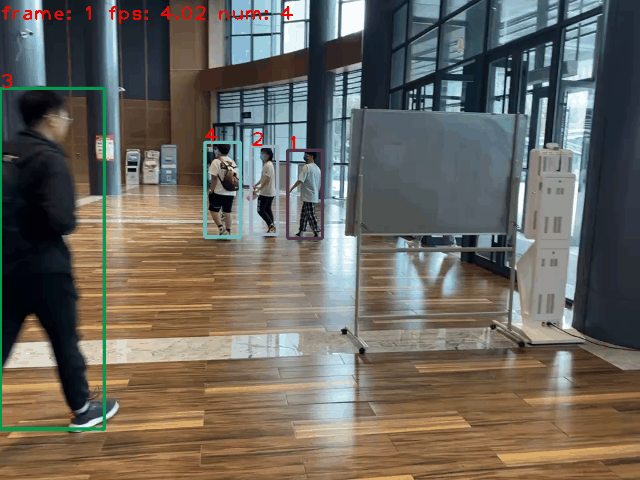
Tracking
Our project also supports multi-object tracking tasks. We use the YOLO of this project as the detector, following the "tracking-by-detection" framework, and use the simple and efficient ByteTrack as the tracker.
images tracking
python track.py --mode image \
            --path_to_img path/to/images/ \
            --cuda \
            -size 640 \
            -dt yolov2 \
            -tk byte_tracker \
            --weight path/to/coco_pretrained/ \
            --show \
            --gif
video tracking
python track.py --mode video \
            --path_to_img path/to/video/ \
            --cuda \
            -size 640 \
            -dt yolov2 \
            -tk byte_tracker \
            --weight path/to/coco_pretrained/ \
            --show \
            --gif
camera tracking
python track.py --mode camera \
            --cuda \
            -size 640 \
            -dt yolov2 \
            -tk byte_tracker \
            --weight path/to/coco_pretrained/ \
            --show \
            --gif
Tracking visualization
- Detector: YOLOv2
- Tracker: ByteTracker
- Device: i5-12500H CPU
Command:
python track.py --mode video \
                --path_to_img ./dataset/demo/videos/000006.mp4 \
                -size 640 \
                -dt yolov2 \
                -tk byte_tracker \
                --weight path/to/coco_pretrained/ \
                --show \
                --gif
Results:
Train on custom dataset
Besides the popular datasets, we can also train the model on ourself dataset. To achieve this goal, you should follow these steps:
Step-1: Prepare the images (JPG/JPEG/PNG ...) and use labelimg to make XML format annotation files.
OurDataset
|_ train
|  |_ images
|     |_ 0.jpg
|     |_ 1.jpg
|     |_ ...
|  |_ annotations
|     |_ 0.xml
|     |_ 1.xml
|     |_ ...
|_ val
|  |_ images
|     |_ 0.jpg
|     |_ 1.jpg
|     |_ ...
|  |_ annotations
|     |_ 0.xml
|     |_ 1.xml
|     |_ ...
|  ...
Step-2: Convert ourdataset to COCO format.
cd <PyTorch_YOLO_Tutorial_HOME>
cd tools
# convert train split
python convert_ours_to_coco.py --root path/to/dataset/ --split train
# convert val split
python convert_ours_to_coco.py --root path/to/dataset/ --split val
Then, we can get a train.json file and a val.json file, as shown below.
OurDataset
|_ train
|  |_ images
|     |_ 0.jpg
|     |_ 1.jpg
|     |_ ...
|  |_ annotations
|     |_ 0.xml
|     |_ 1.xml
|     |_ ...
|     |_ train.json
|_ val
|  |_ images
|     |_ 0.jpg
|     |_ 1.jpg
|     |_ ...
|  |_ annotations
|     |_ 0.xml
|     |_ 1.xml
|     |_ ...
|     |_ val.json
|  ...
- Step-3 Define our class labels.
Please open dataset/ourdataset.py file and change our_class_labels = ('cat',) according to our definition of categories.
For example:
cd <PyTorch_YOLO_Tutorial_HOME>
python train.py --root path/to/dataset/ -d ourdataset -m yolov1 -bs 16 --max_epoch 100 --wp_epoch 1 --eval_epoch 5 -p path/to/yolov1_coco.pth
For example:
cd <PyTorch_YOLO_Tutorial_HOME>
python test.py --root path/to/dataset/ -d ourdataset -m yolov1 --weight path/to/checkpoint --show
For example:
cd <PyTorch_YOLO_Tutorial_HOME>
python eval.py --root path/to/dataset/ -d ourdataset -m yolov1 --weight path/to/checkpoint
Deployment
- ONNX export and an ONNXRuntime

 yjh0410
93b7481820
optimize yolov7 codes
yjh0410
93b7481820
optimize yolov7 codes